SQL replication Keywords Explanation and Basic Terms
Source Database
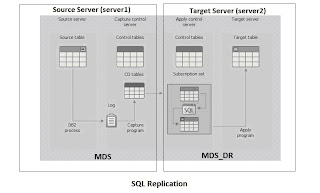
The replication source is the table in a database from which you want to extract data to replicate to a table in your replication target
Capture Control
The Capture program records changes to the tables that you register as source tables
Capture control tables must be created in the source database
Apply Control
Apply control tables. These tables will store information that the Apply program needs to know to apply changes to the target.
Target Database
The replication target is the table in a database to which you want to replicate data from your replication source
Registered Tables
After you create a set of Capture control tables, you can tell the Capture program which tables you want to replicate by registering them. These tables will be your source tables
Subscription Sets
A subscription set defines the relationship between the replication source database and a target database
Subscription-set member
Subscription-set member defines the relationship between the replication source tables and one or more target tables
CDTable
(Change Data Table) The Replication Center creates a change-data (CD) table, which the Capture program uses to record changes made to the registered table.
Networking requirements
A system running the Replication Center must be able to access:
All DB2 Capture Control Servers, Apply Control Servers, Monitor Servers, and DB2 target servers
Requirements at replication servers
DB2 on the systems with the Capture Control tables, Apply Control Tables, Monitor Control Tables, and the target tables needs to be able to accept connections from the DB2 Client on the Replication Center workstation and you will need a user id on those systems that can read the DB2 system catalog, create Capture, Apply, and Monitor Control tables, staging tables and target tables.
The Replication Center user will also need a user id on these systems that can read the DB2 system catalog, can create the Capture, Apply, Monitor, staging and target tables, and can bind packages.
Installing DB2 Server for SQL Replication
To install a DB2 Server or DB2 Connect product, it should be with an account in the Administrators group
Before Configuring SQL Replication we need to catalog entries for the remote system on both the servers
Note: Be sure to use the user ID that you used to create the Source DB and Target DB databases. That user ID has the authority (DBADM or SYSADM) that is required to perform replication tasks.
Commands to catalog remote entries on Source server (SERVER1)
Ø db2 catalog admin tcpip node SERVER2 remote SERVER2 system SERVER2 [ostype WIN]
Ø db2 catalog tcpip node DB2_SERVER2 remote SERVER2 server 50000 remote_instance DB2 system SERVER2 [ostype NT64]
Ø db2 catalog database MDS_DR as MDS_DR at node SERVER2
Commands to catalog remote entries on Target server (SERVER2)
Ø db2 catalog admin tcpip node SERVER1 remote SERVER1 system SERVER1 [ostype WIN]
Ø db2 catalog tcpip node DB2_SERVER1 remote SERVER1 server 50000 remote_instance DB2 system SERVER1 [ostype NT64]
Ø db2 catalog database MDS as MDS at node SERVE
Planning the SQL Replication
Replication options
You can choose replication options that, for example, determine where the change-data (CD) table, target table, and control tables are stored, how often you want replication to occur, and which records (based on the criteria you specify) you want to delete from the IBMSNAP_APPLYTRAIL table after each replication cycle.
For the purpose of this tutorial, store the CD table, the target table, and the control tables in their respective default table spaces.
Typically, you create the CD table in a table space separate from that of the source table space (USERSPACE1) to reduce potential contention at the table-space level. To do so, accept the defaults (or define a profile within the Replication Center) for the table spaces of the replication control tables. In a production environment, be sure to create each table space on a separate device to reduce potential contention.
For this tutorial, schedule SQL replication to check for any changes in the source table every minute, and then replicate the changes to the target table. Although a report-generating application does not require this frequency of checking, for this tutorial, you want to be able to test the replication environment and verify that everything is working correctly.
Also, you decide that after each replication cycle, you want to delete any records from the IBMSNAP_APPLYTRAIL table that are older than one week (seven days). This pruning prevents the table from growing too large.
Replication source
The replication source is the table in a database from which you want to extract data to replicate to a table in your replication target. Before you set up your environment, you must decide what you want to replicate from that table.
Replication target
The replication target is the table in a database to which you want to replicate data from your replication source. You can create a new table in your target database or use an existing target table. For this tutorial, you will create a new table.
The replication target will be a table in the new database, MDS_DR, which you created. Currently, no target table exists in that database, and you decide to use the Replication Center to create the target table according to your specifications. This method of automatically generating a target table is preferred because it ensures correct mapping to the replication source.
Setting up the replication environment
After planning the replication model, the next steps you complete in this tutorial involve setting up the replication environment.
Because almost all of the following steps use the Replication Center, be sure that it is running. From the Windows® Start menu: select Start > All Programs > IBM DB2 > DB2_copy > General Administration Tools > Replication Center
Step 1: Create control tables for the Capture program
The first step in setting up the replication environment is to create control tables for the Capture program.
About this task
The Capture program reads the control tables for current registration information and then stores its status in these tables. Any database that acts as a Capture control server must contain the Capture control tables.
Procedure
To create Capture control tables:
- Expand the SQL Replication folder.
- Expand the Definitions folder.
- Right-click the Capture Control Servers folder and select Create Capture Control TablesQuick. (You could also customize the Capture control tables by selecting Create Capture Control TablesCustom.)
- In the Select a Server window, select the MDS database. This database will be your Capture control server. Click OK.
- In the Create Control Tables - Quick - Server Information window, select Host sources for replication and capture changes to those sources. Then, click Next.
- In the Create Control Tables - Quick - Replication Details window, click Next. You do not need to change any of the information in this window.
- In the Create Control Tables - Quick - Table Spaces window, enter the table space specification for the TSASNCA table space. For example, set the buffer pool to IBMDEFAULTBP. For the purposes of this tutorial, click OK and accept the default control table schema, ASN.
- In the Create Control Tables - Quick - Table Spaces window, enter the table space specification for the TSASNUOW table space.
- After you enter information for both table spaces in the Create Control Tables - Quick - Table Spaces window, click OK.
- Click Close on the Messages and SQL Scripts window. This window shows the results of generating the SQL script that creates the Capture control tables. If there are any errors, they are displayed in this window.
- Enter a valid user ID and password in the Run Now or Save SQL window and click OK to process the SQL script immediately. You should see a message in the DB2® Message window stating that the script ran successfully.
- Click Close.
- Expand the Capture Control Servers folder. The MDS database should be displayed under the folder.
Note: If your database is already in Archive log mode skip step 2
Step 2: Enable the source database for replication
The next step is to enable the source database for replication. The Capture program reads the DB2® log for records that reflect changes to registered tables. The log must be an archive log type (as opposed to a circular log type) to avoid having DB2 overwrite the log before the Capture program can read it.
About this task
For Linux®, UNIX®, and Windows® environments, the DB2 default is circular logging. Use the following procedure to change this setting to archive logging.
Procedure
To enable the source database for replication:
- Expand the Capture Control Servers folder.
- Right-click the MDS database and select Enable Database for Replication.
- Click OK on the Enable Database for Replication window to use archive logging for the MDS database and to initiate a backup for the database.
- In the Backup window, specify the information for the database backup, and click Backup Now.
After you back up the database, you could start the Capture program. However, for this tutorial, do not start it yet.
Step 3: Register a replication source
After you create the Capture control tables and enable the database for replication, you need to register the table in your replication source database as a replication source.
About this task
Use the following steps to register the tables in the MDS database as a replication source. When you register the table, a change-data (CD) table named CDTABLENAME (example EMP table will be CDEMP) is automatically created to receive changes from the registered source table. The Apply program then fetches the changes from the CD table.
Procedure
To register a table as a replication source:
- Expand the SQL Replication folder.
- Expand the Definitions folder.
- Expand the Capture Control Servers folder.
- Expand the MDS database.
- Expand the Capture Schemas folder.
- Expand the ASN schema.
- Right-click the Registered Tables folder and select Register Tables.
- In the Add Registerable Tables window, click Retrieve All to list all of the tables in the MDS database that you can register as replication sources. Select the tables and click OK
- In the Register Tables window, click the CD Table tab. Specify the following information for the CD table space:
- In the Specification for the table space area, clicke the container name field and specify the container name for the TABLESPACE (use existing table space name) table space.
- In the Specification for table space area, change the Size field entry to.
- In the Specification for table space area, change the Unit field entry to MB.
- Specify the other information for this new table space; for example, set the buffer pool to IBMDEFAULTBP.
- After you enter the table-space information, click OK.
- Click OK on the Run Now or Save SQL window to process the SQL script immediately. You should see a message in the DB2® Message window stating that the script ran successfully.
- Click Close.
- The contents pane for the MDS database folder should now show the selected tables as a registered table.
The selected tables are now defined as a replication source. When you ran the SQL script, the Replication Center creates the CD tables and CD-table indexes for this replication source, and it updated the Capture control tables
Step 4: Create control tables for the Apply program After you create control tables for the Capture program, you need to create control tables for the Apply program.
About this task
The Apply program reads the control tables for current subscription-set information and stores its status in these tables. Any database that acts as an Apply control server must contain the Apply control tables.
Procedure
To create Apply control tables:
- Expand the SQL Replication folder.
- Expand the Definitions folder.
- Right-click the Apply Control Servers folder and select Create Apply Control TablesQuick. Alternatively, you could customize the Apply control tables by selecting Create Apply Control TablesCustom.
- In the Select a Server window, select the MDS_DR database. This database will be your Apply control server. Click OK.
- In the Create Control Tables - Quick - Server Information window, select Apply captured changes to target tables and then click Next.
- In the Create Control Tables - Quick - Replication Details window, click Next. You do not need to change any of the information in this window.
- In the Create Control Tables - Quick - Table Spaces window, enter the table space specification for the TSASNAA table space. For example, set the buffer pool to IBMDEFAULTBP. Click OK.
- Click Close on the Messages and SQL Scripts window. This window shows the results of generating the SQL script that will create the Apply control tables. If there are any errors, they are displayed in this window.
- Enter a valid user ID and password in the Run Now or Save SQL window and click OK to process the SQL script immediately. You should see a message in the DB2® Message window stating that the script ran successfully.
- Click Close.
- Expand the Apply Control Servers folder. The MDS_DR database should be displayed under the folder.
Step 5: Create a subscription set and a subscription-set member
After you register the source table, you need to create a subscription set and a subscription-set member to define relationships between the replication source database and a target database and between the replication source table and one or more target tables.
About this task
A subscription set defines the relationship between the replication source database (MDS in this tutorial) and a target database (MDS_DR in this tutorial). A subscription-set member defines the relationship between the replication source tables and one or more target tables
Procedure
To create a subscription set and a subscription-set member:
- Expand the SQL Replication folder.
- Expand the Definitions folder.
- Expand the Apply Control Servers folder.
- Expand the COPYDB database.
- Right-click the Subscription Sets folder and select Create.
You can also create a subscription set by selecting the Registered Tables folder of the SAMPLE database, right-clicking the DEPARTMENT table in the contents pane, and selecting Create Subscription Set.
- In the Set Information page of the Create Subscription Set window, enter the following information:
- In the Set name field, enter MDS_DR_SUB. This string identifies the subscription set and must be unique for a particular Apply qualifier.
- In the Apply qualifier field, enter MDS_DR_QUAL. This string identifies the replication definitions that are unique to the instance of the Apply program that will run this subscription set.
- Tip: The Apply qualifier is case-sensitive. If you want the Apply qualifier to be in lowercase characters, you must delimit it when you type it; for example,
"mds_dr_qual". If you simply type mds_dr_qual, the Replication Center converts the value to uppercase characters by default. - Click the browse button [...] for the Capture control server alias field. In the Select a Capture Control Server window, select the MDS database and click OK.
- Click the browse button [...] for the Target server alias field. In the Select a Target Server window, select the MDS_DR database and click OK. The MDS_DR database is both the target server and the Apply control server.
- Select the Activate the subscription set check box.
7. On the Source-to-Target Mapping tab of the Create Subscription Set window, enter the following information: - Click Add to add a registered source to the subscription-set member.
- In the Add Registered Sources window, click Retrieve All to display all registered sources in the MDS database.
- In the Add Registered Sources window, select the tables and click OK.
- In the Source-to-Target Mapping tab of the Create Subscription Set window, change the name of the target table by removing TG (TGEMP to EMP: select TGEMP in the Target Name column of the Subscription-set members table, and change it to EMP)
Do not change the target type because you want to create a user copy target table.
- Click Change to open the Member Properties window. From this window, you can define the properties for the subscription-set member.
Because, for the purposes of this tutorial, you want to replicate all columns and create the same columns in the target table as in the source table, you do not need to make any changes to the Column Selection or Column Mapping tabs of the Member Properties window. By default, the target table contains all of the columns that you registered for the source.
Tip for federated: If your company's replication configuration maps a source table to an existing target table and at least one of the tables is from a non-DB2 relational database, see the Federated Systems Guide for more information on how to map the source columns to columns in the existing target table.
8. On the Target-Table Index tab of the Member Properties window:
- Click Create your own index.
- Select the any column from the Available columns in the target list.
- Click the move button (>) to move the selected column to the Columns used in the index list.
- Make sure that Use selected columns to create primary key is selected to use the any one column as the primary key for the target table.
- On the Target-Table Table Space tab of the Member Properties window, specify the following information for the existing table space.
- Click OK to close the Member Properties window. For the purposes of this tutorial, you do not need to do anything on the Target load options tab.
- On the Schedule tab of the Create Subscription Set window, change the number of minutes to 1 so that the Apply program will process this subscription set every minute. To change the number of minutes, use the spin button on the Minutes field in the Frequency of replication area to select one-minute intervals (or type 1 in the field).
Keep the default values for Start date, Start time, Time-based, and Use relative timing.
- On the Statements tab of the Create Subscription Set window, click Add to open the Add SQL Statement or Procedure Call window. Use this window to define the SQL statements that will be processed when the subscription set is run. In the Add SQL Statement or Procedure Call window, enter the following information:
- In the SQL Statement field, enter:
- DELETE FROM ASN.IBMSNAP_APPLYTRAIL WHERE LASTRUN < (CURRENT TIMESTAMP - 7 DAYS)
This statement deletes any records in the IBMSNAP_APPLYTRAIL table that are older than seven days.
The Apply program executes the SQL statement that you added at the target server after the subscription set is processed. The SQL statement must run on the target server because the Apply control server and target server are co-located, and the IBMSNAP_APPLYTRAIL table is on the Apply control server.
Tip: The Apply program runs SQL statements or procedures that you add to a subscription set during every subscription cycle. This example is inefficient because the Apply program will execute this statement every minute, even though the statement will only delete data from the IBMSNAP_APPLYTRAIL table, at most, once every 24 hours.
a. In the SQLSTATE field, enter 02000 and click Add. This SQL state indicates that a "row not found" error is acceptable and that the Apply program should ignore such errors.
Tip: You can define as many as ten SQL states that you want the Apply program to ignore for this subscription set.
b. Click OK to close the Add SQL Statement or Procedure Call window.
- Click OK to close the Create Subscription Set window.
- Click Close on the Messages and SQL Scripts window. This window shows the results of generating the SQL script that will update the Apply control tables and create the target table. If there are any errors, they are displayed in this window.
- Click OK on the Run Now or Save SQL window to process the SQL script immediately.
Alternately, to save the SQL script to a file for future uses and also run it now:
- Select Save to file.
- Fill in the information in the Save specifications area, such as the file name.
- Click Apply to save the file. If the script has multiple parts, and you did not select the Save multiple scripts in one file check box, each part is saved to a separate file that uses the name that you specify plus a number. The Run Now or Save SQL window remains open.
- Select Run now.
- Click OK to run the script and close the Run Now or Save SQL window.
You should see a message in the DB2® Message window stating that the script ran successfully at both the MDS and MDS_DR servers.
16. Click Close
17.
Expand the Apply Control Servers folder and the MDS_DR database, and then click the Subscription Sets folder. The contents pane for the Subscription Sets folder should now show the MDS_DR_SUB subscription set. Step 6: Create an Apply password file Because the Apply program needs to connect to the Capture control server, the Apply control server, and the target server, you must create a password file for user authentication. Because the contents of the password file are encrypted, only the Apply program can read the file, although you can modify the file.
Procedure
To create an Apply password file:
- Open a Windows® command prompt window and change to the C:\..\sqllib\bin directory.
- Enter the following command to create a default password file:
asnpwd init using " path"
Where path is the fully specified directory path and file name that you want to use when you create the password file. You should see message ASN1981I, confirming that the command completed successfully.
For example, if you want to store the password file in the c:\repl directory and name the file asnpwd.aut, enter the following command:
asnpwd init using "c:\repl\asnpwd.aut"
Where c:\repl\asnpwd.aut represents the fully specified directory path and file name of the password file.
Tip: Create the password file in the directory in which you will start the Apply program. When you start the Apply program, you specify the file name for the password file (using the PWDFILE keyword) and the value for the directory in which the Apply program will store its log and work files (using the APPLY_PATH keyword). One of the Apply program's work files is the password file.
Enter the following command to add the user ID and password information for each
database to which the Apply program must connect:
asnpwd add alias MDS id db2admin password db2admin using "c:\repl\asnpwd.aut "
Where userid is a valid DB2® user ID with sufficient authority to update the Capture and Apply control tables, password is the password for the valid DB2 user ID, and path is the fully specified directory path and file name that you entered when you created the password file. You should see message ASN1981I, confirming that the command completed successfully.
Step 7: Replicate the data for the tutorial scenario
After you register the replication source and create the subscription set, you are ready to replicate the data for this tutorial.
Procedure
To start the Capture and Apply programs, which will perform the initial full refresh for the target table and begin change-capture replication:
- Start the Capture program:
- Expand the SQL Replication folder.
- Expand the Operations folder.
- Select the Capture Control Servers folder. The SAMPLE database should be displayed in the contents pane for Capture control servers.
- Right-click the MDS database and select Start Capture.
- In the Start Capture window, select ASN in the Capture schema field.
- Click OK on the Start Capture window.
- When prompted, insert the user ID and password in the Run specifications section, and then Click OK on the Run Now or Save Command window to process the command immediately.
- You should see a message in the DB2® Message window stating that the command ran successfully. Click Close. The Capture program is now running, but will not begin capturing changes for registered tables until the Apply program completes a full refresh for all registered tables.
- Start the Apply program
- Expand the SQL Replication folder.
- Expand the Operations folder.
- Expand the Apply Control Servers folder.
- Expand the MDS_DR database.
- Select the Apply Qualifiers folder. The MDS_DR_QUAL Apply qualifier for subscription set MDS_DR_SUB should be displayed in the contents pane for Apply qualifiers.
- Right-click the MDS_DR_QUAL Apply qualifier and select Start Apply.
- In the Start Apply window, click the browse button for the Where Apply is running field to select the system or IP address on which to run the Apply program.
- Click OK on the Start Apply window.
- If necessary, type a valid user ID and password for the system on which you will run the Apply program in the Run Now or Save Command window.
- Click OK on the Run Now or Save Command window to process the command immediately.
- You should see a message in the DB2 Message window stating that the command ran successfully. Click Close. The Apply program is now running.
If you view the target tables after one replication cycle, you should see results that match the source data. You can use any of the following methods to view the contents of the table:
- Use the Replication Center:
- Expand the SQL Replication folder.
- Expand the Definitions folder.
- Expand the Apply Control Servers folder.
- Expand the MDS_DR database.
- Right-click the Dependent Targets folder and select View Selected Contents.
- Use the DB2 Control Center:
- Expand the databases folder for your DB2 instance.
- Expand the MDS_DR database.
- Select the Tables folder.
- Right-click the any table in the contents pane and select Sample Contents.
- Use the DB2 Command Center or a DB2 command window to issue the following SQL statement:
SELECT * FROM schema.TABLENAME